Smoked Beef Brisket on a Kettle Grill Using the Snake Method


Ingredients

  • 1 whole packer brisket (12–16 lbs, Prime or Choice grade)
  • Salt
  • Coarse black pepper (16-mesh ideal)
  • Optional: garlic powder, onion powder, paprika for rub variation
  • Wood chunks/chips (hickory, oak, or post oak for Texas-style; soak chips if using)
  • Hot water (for the pans)
  • Optional for wrap: beef broth, tallow, or butter
  • Heavy-duty aluminum foil or pink butcher paper

Equipment

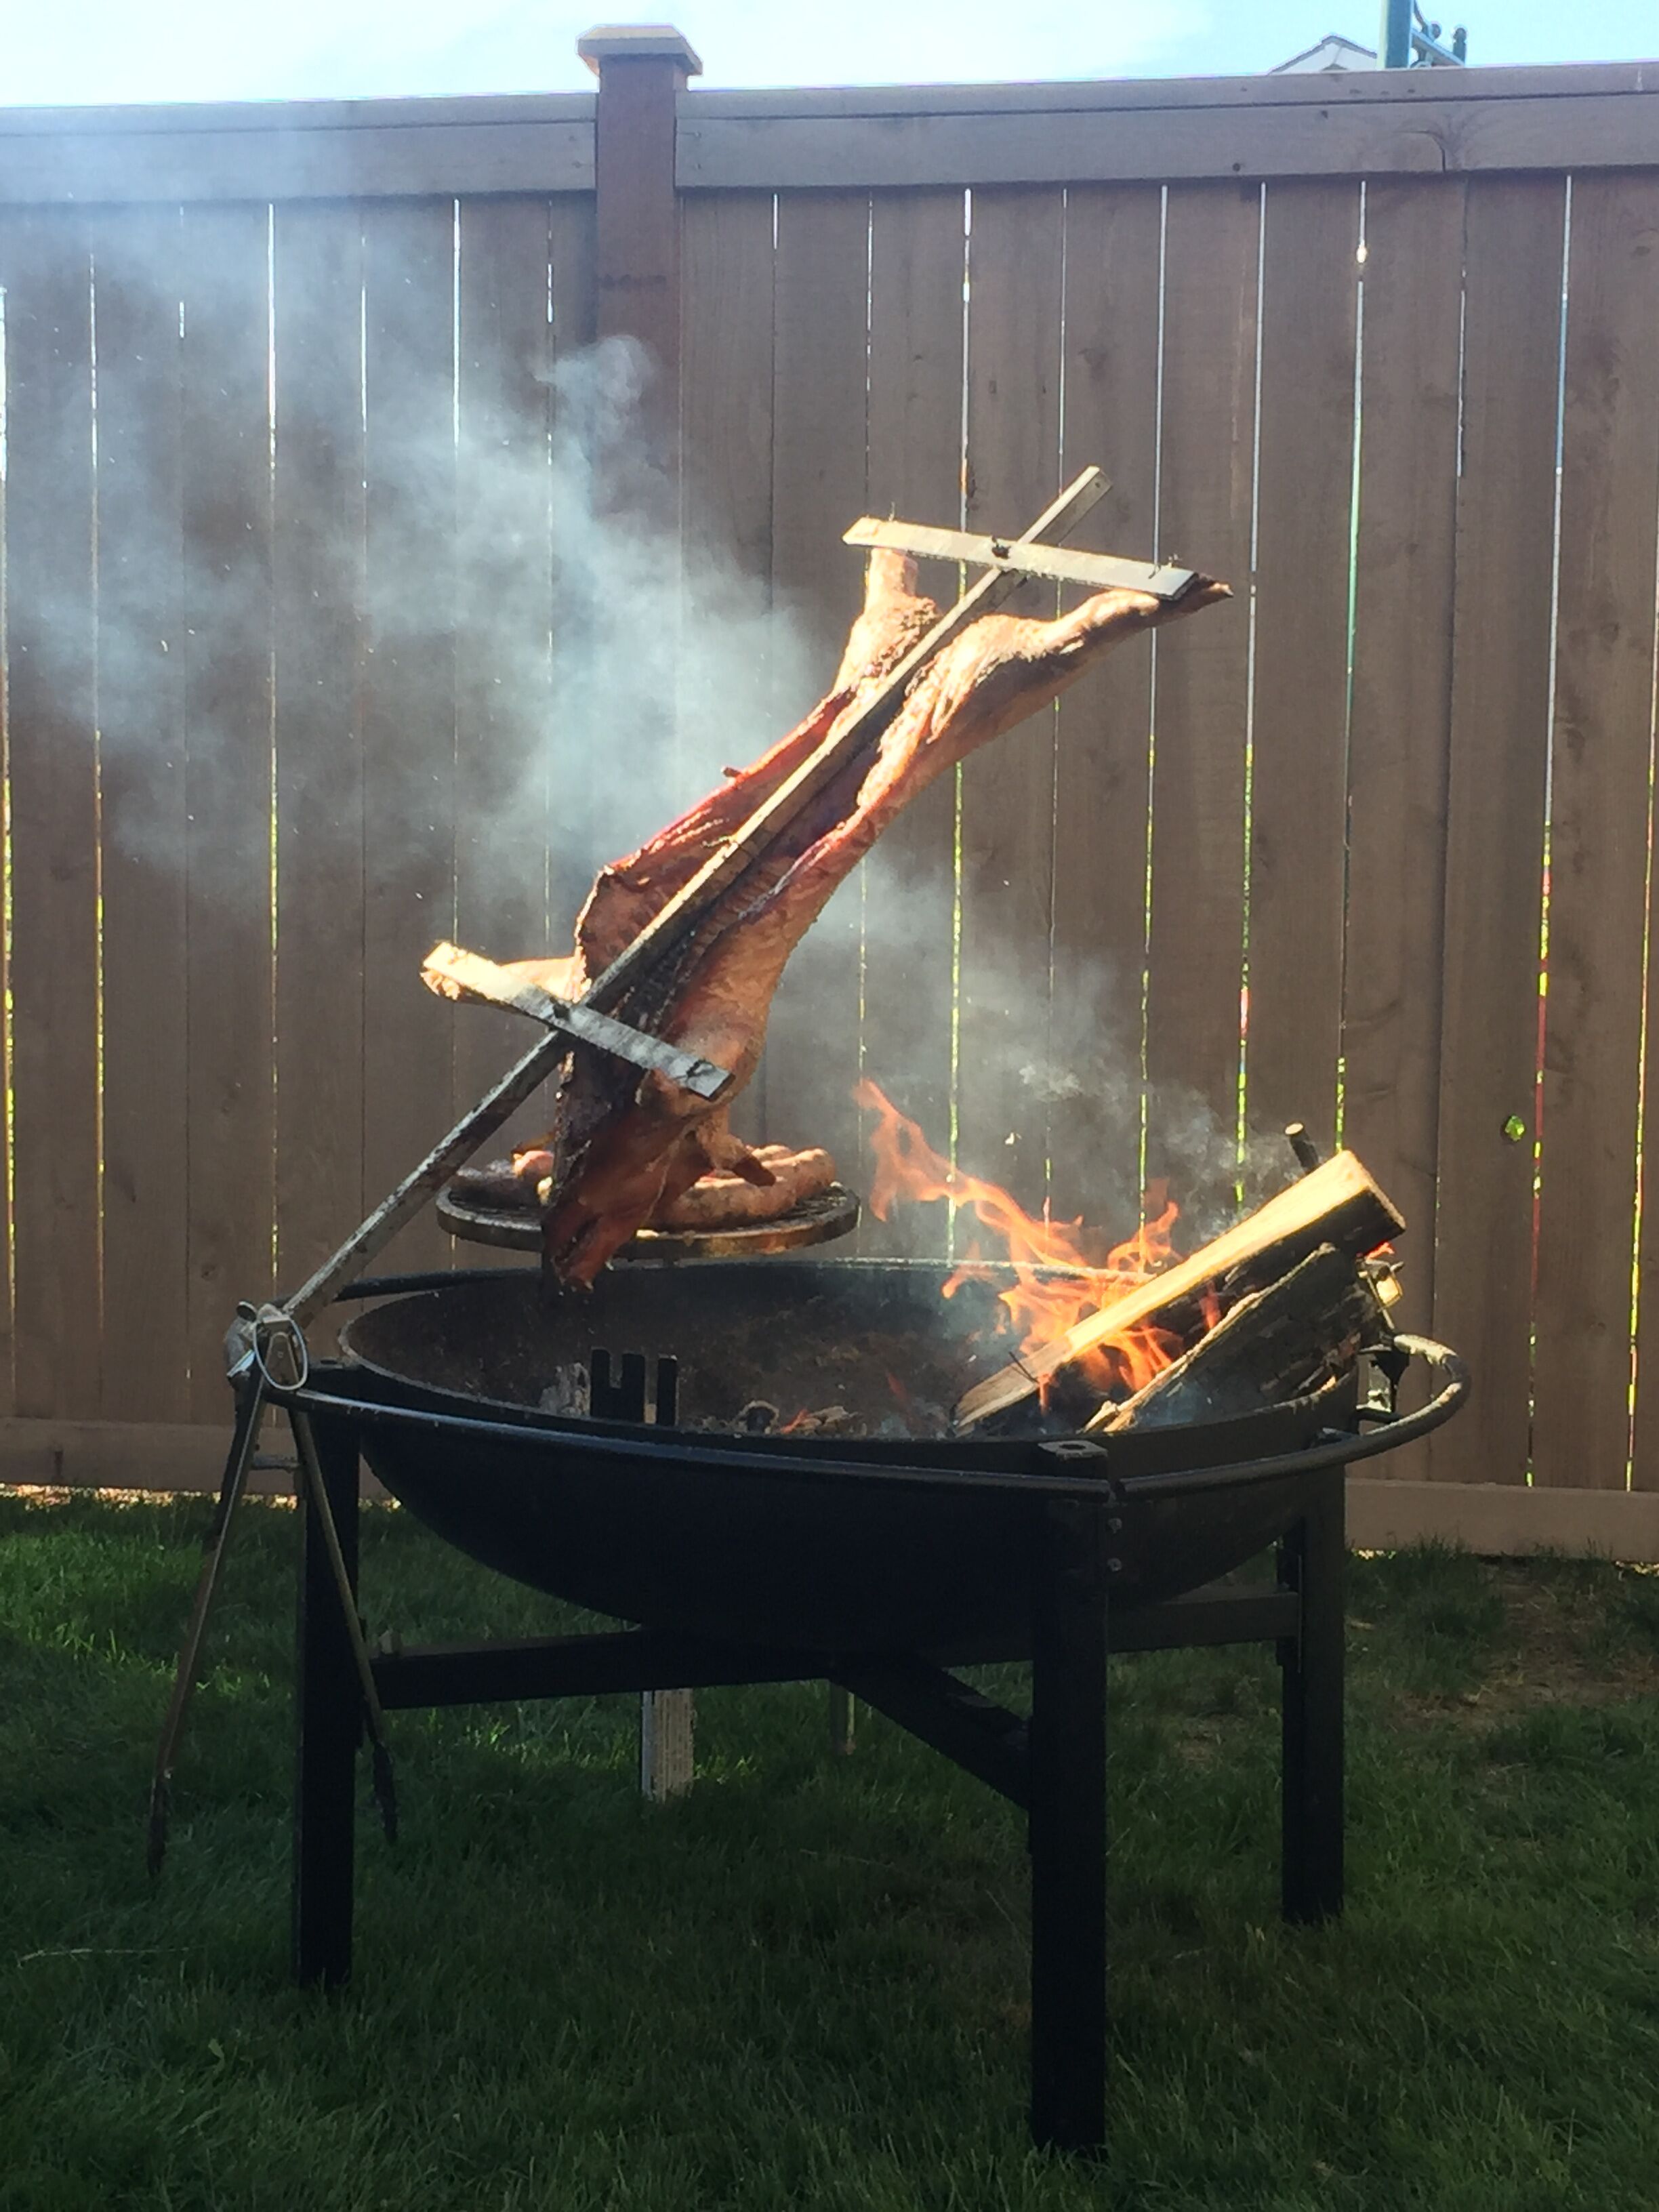
  • Barrel smoker or Kettle grill (22″ or similar)
  • Charcoal briquettes (Kingsford or similar)
  • 2 small aluminum foil pans
  • Instant-read thermometer (Thermapen or similar)
  • Heavy-duty foil
  • Cooler + towels for resting

Instructions

  1. Prep the Brisket (day before or morning of)
    • Trim excess hard fat, aim for ¼-inch fat cap. Square up edges if desired.
    • Apply simple rub: 50/50 salt and coarse black pepper (about ½ cup total for a 14-lb brisket). Coat generously on all sides.
    • Rest uncovered in fridge 4–12 hours (overnight ideal) for better bark formation.
  2. Set Up the Snake Method
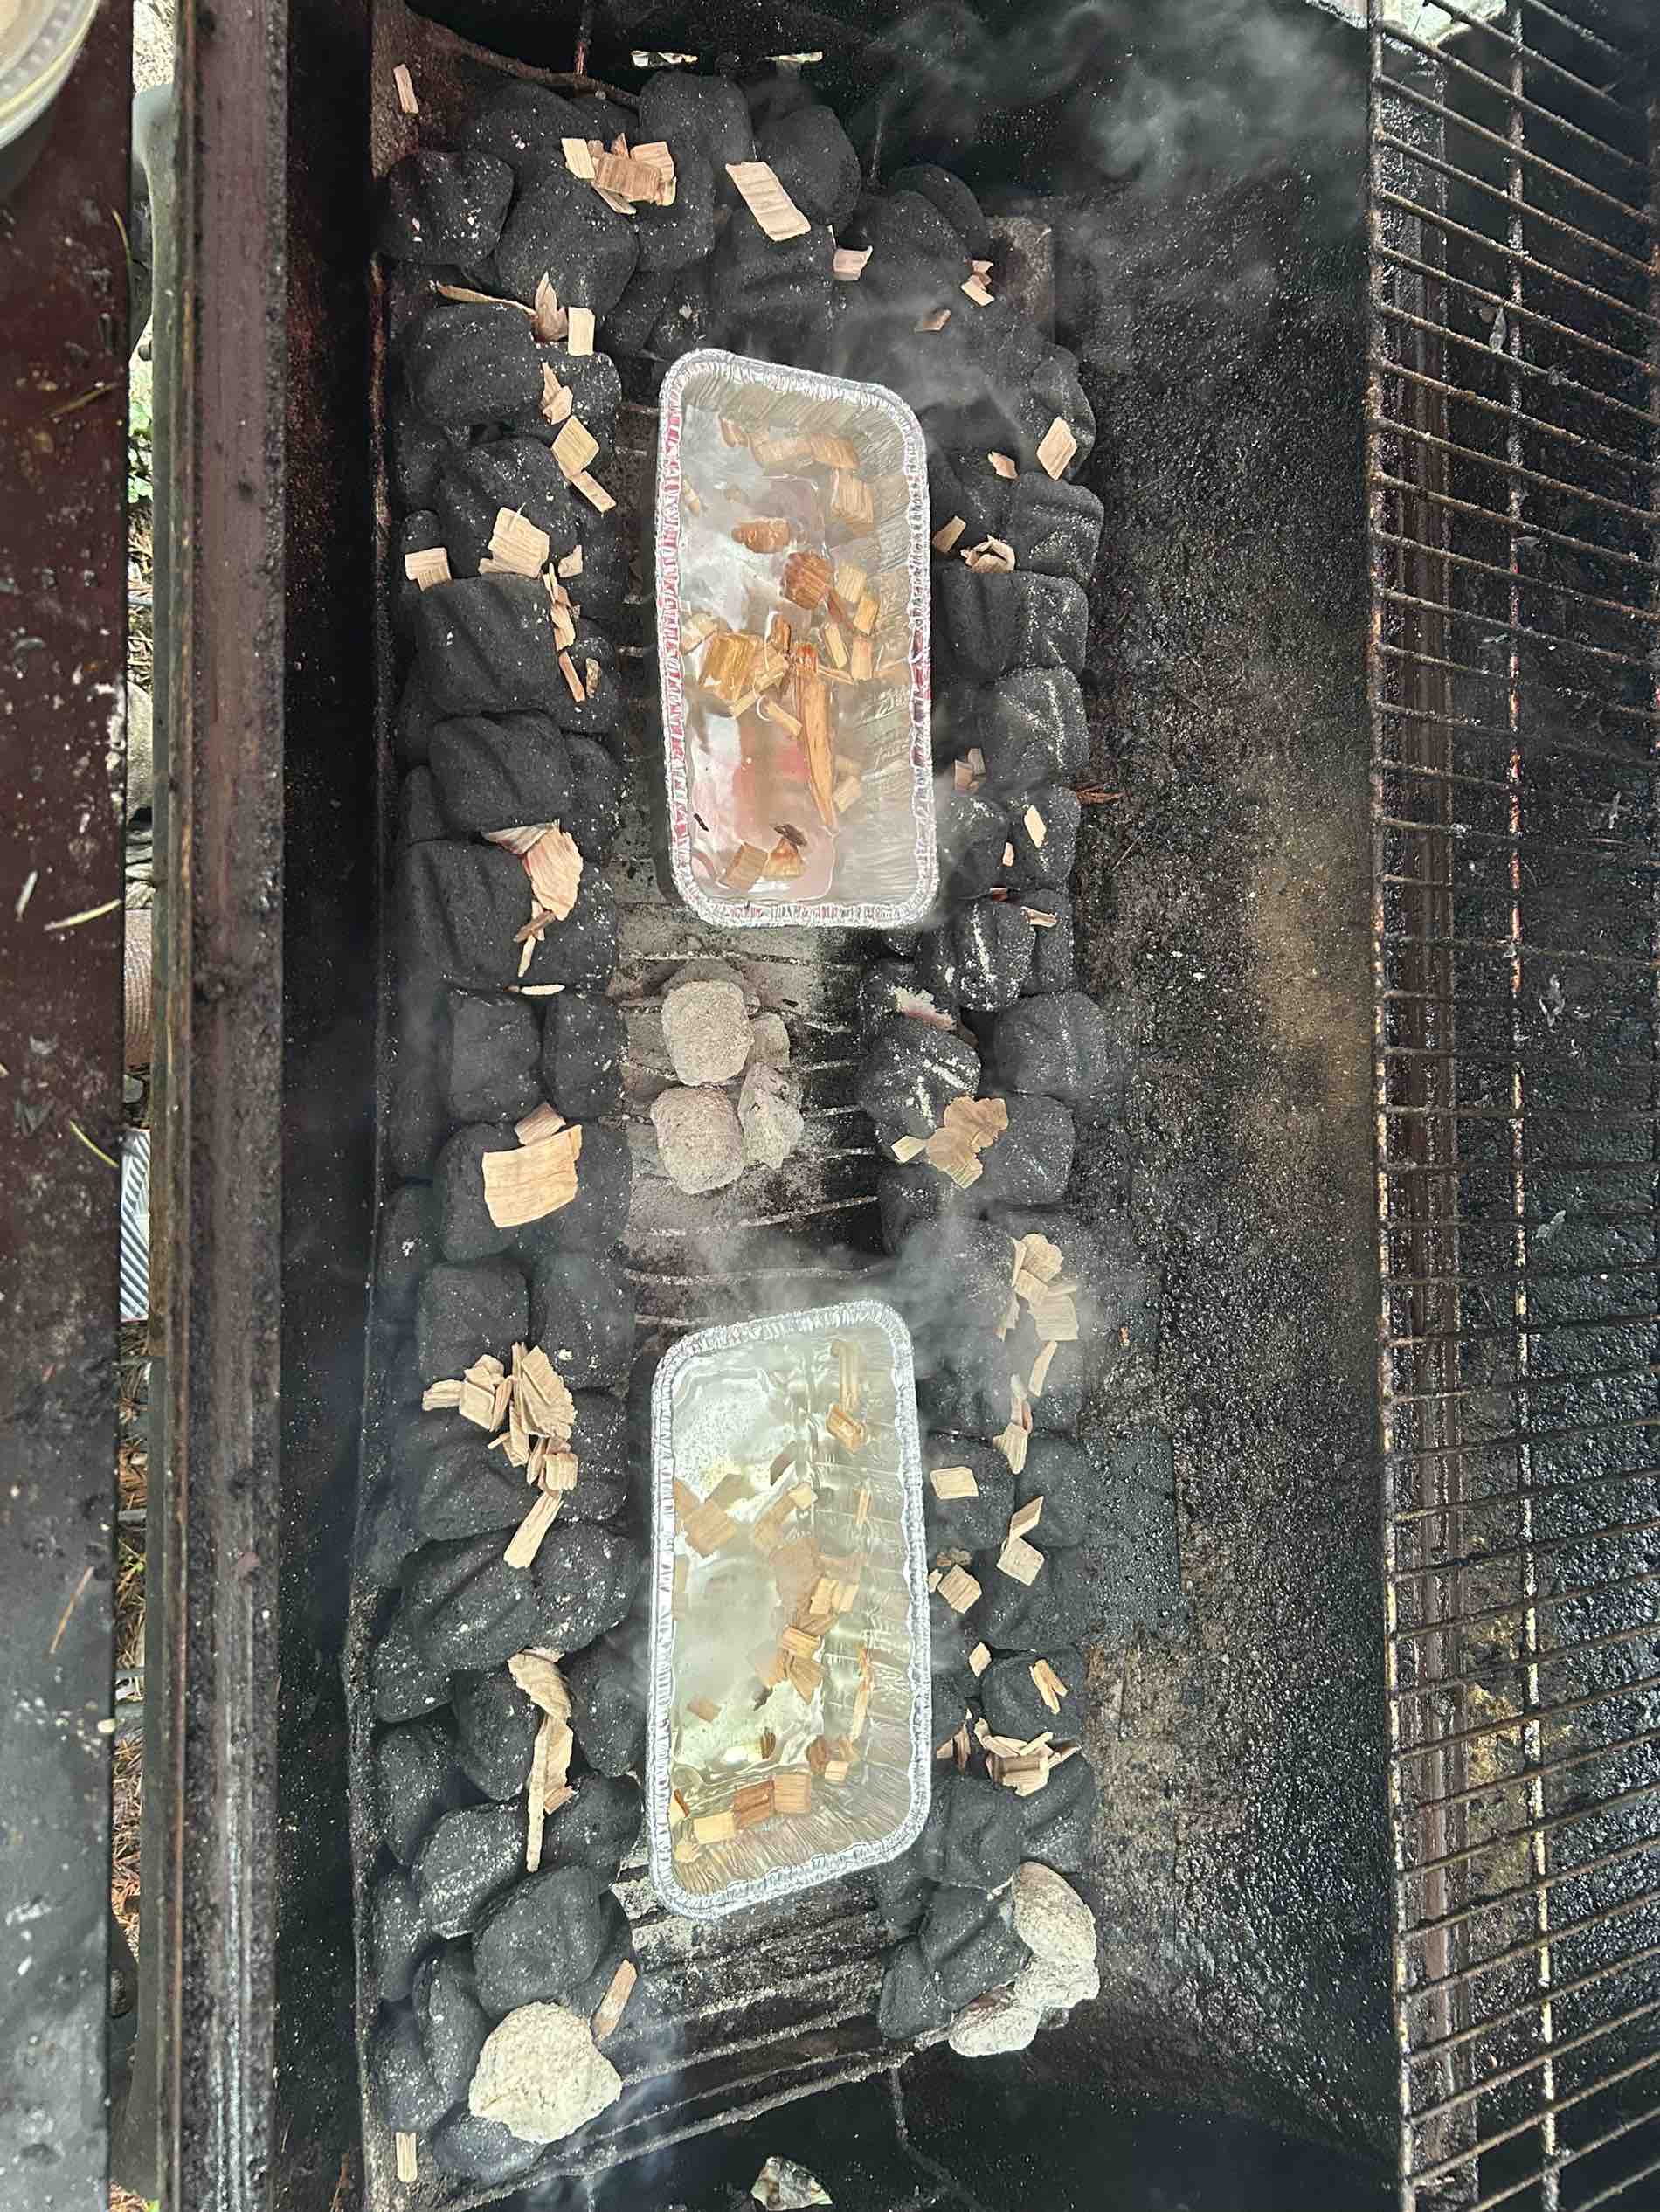
    • Arrange briquettes in a semi-circle (snake) 2 briquettes wide and 2 high along half the perimeter of the grill.
    • Place a few wood chunks on top of the briquettes along the snake.
    • Fill 2 small aluminum pans with soaked wood chips/chunks (or dry chunks) and add hot water to one or both pans for extra humidity and temperature stability.
    • Place the pans directly in between the briquettes near the start and middle of the snake for steady smoke.
    • On a barrel smoker you might want to light both ends (left and right) to heat the long space evenly.
    • Light 8–10 briquettes in a chimney. Once fully lit, place them at one end of the snake to start the slow burn.
  3. Start the Cook
    • Place brisket on the grate fat side up or down (both work; fat up renders into meat, fat down shields from heat).
    • Position it in the center, away from the snake.
    • Close lid, adjust vents to hold 225–250°F (bottom vent ¼–½ open, top vent half open).
    • No need to flip or rotate unless one side gets noticeably hotter.
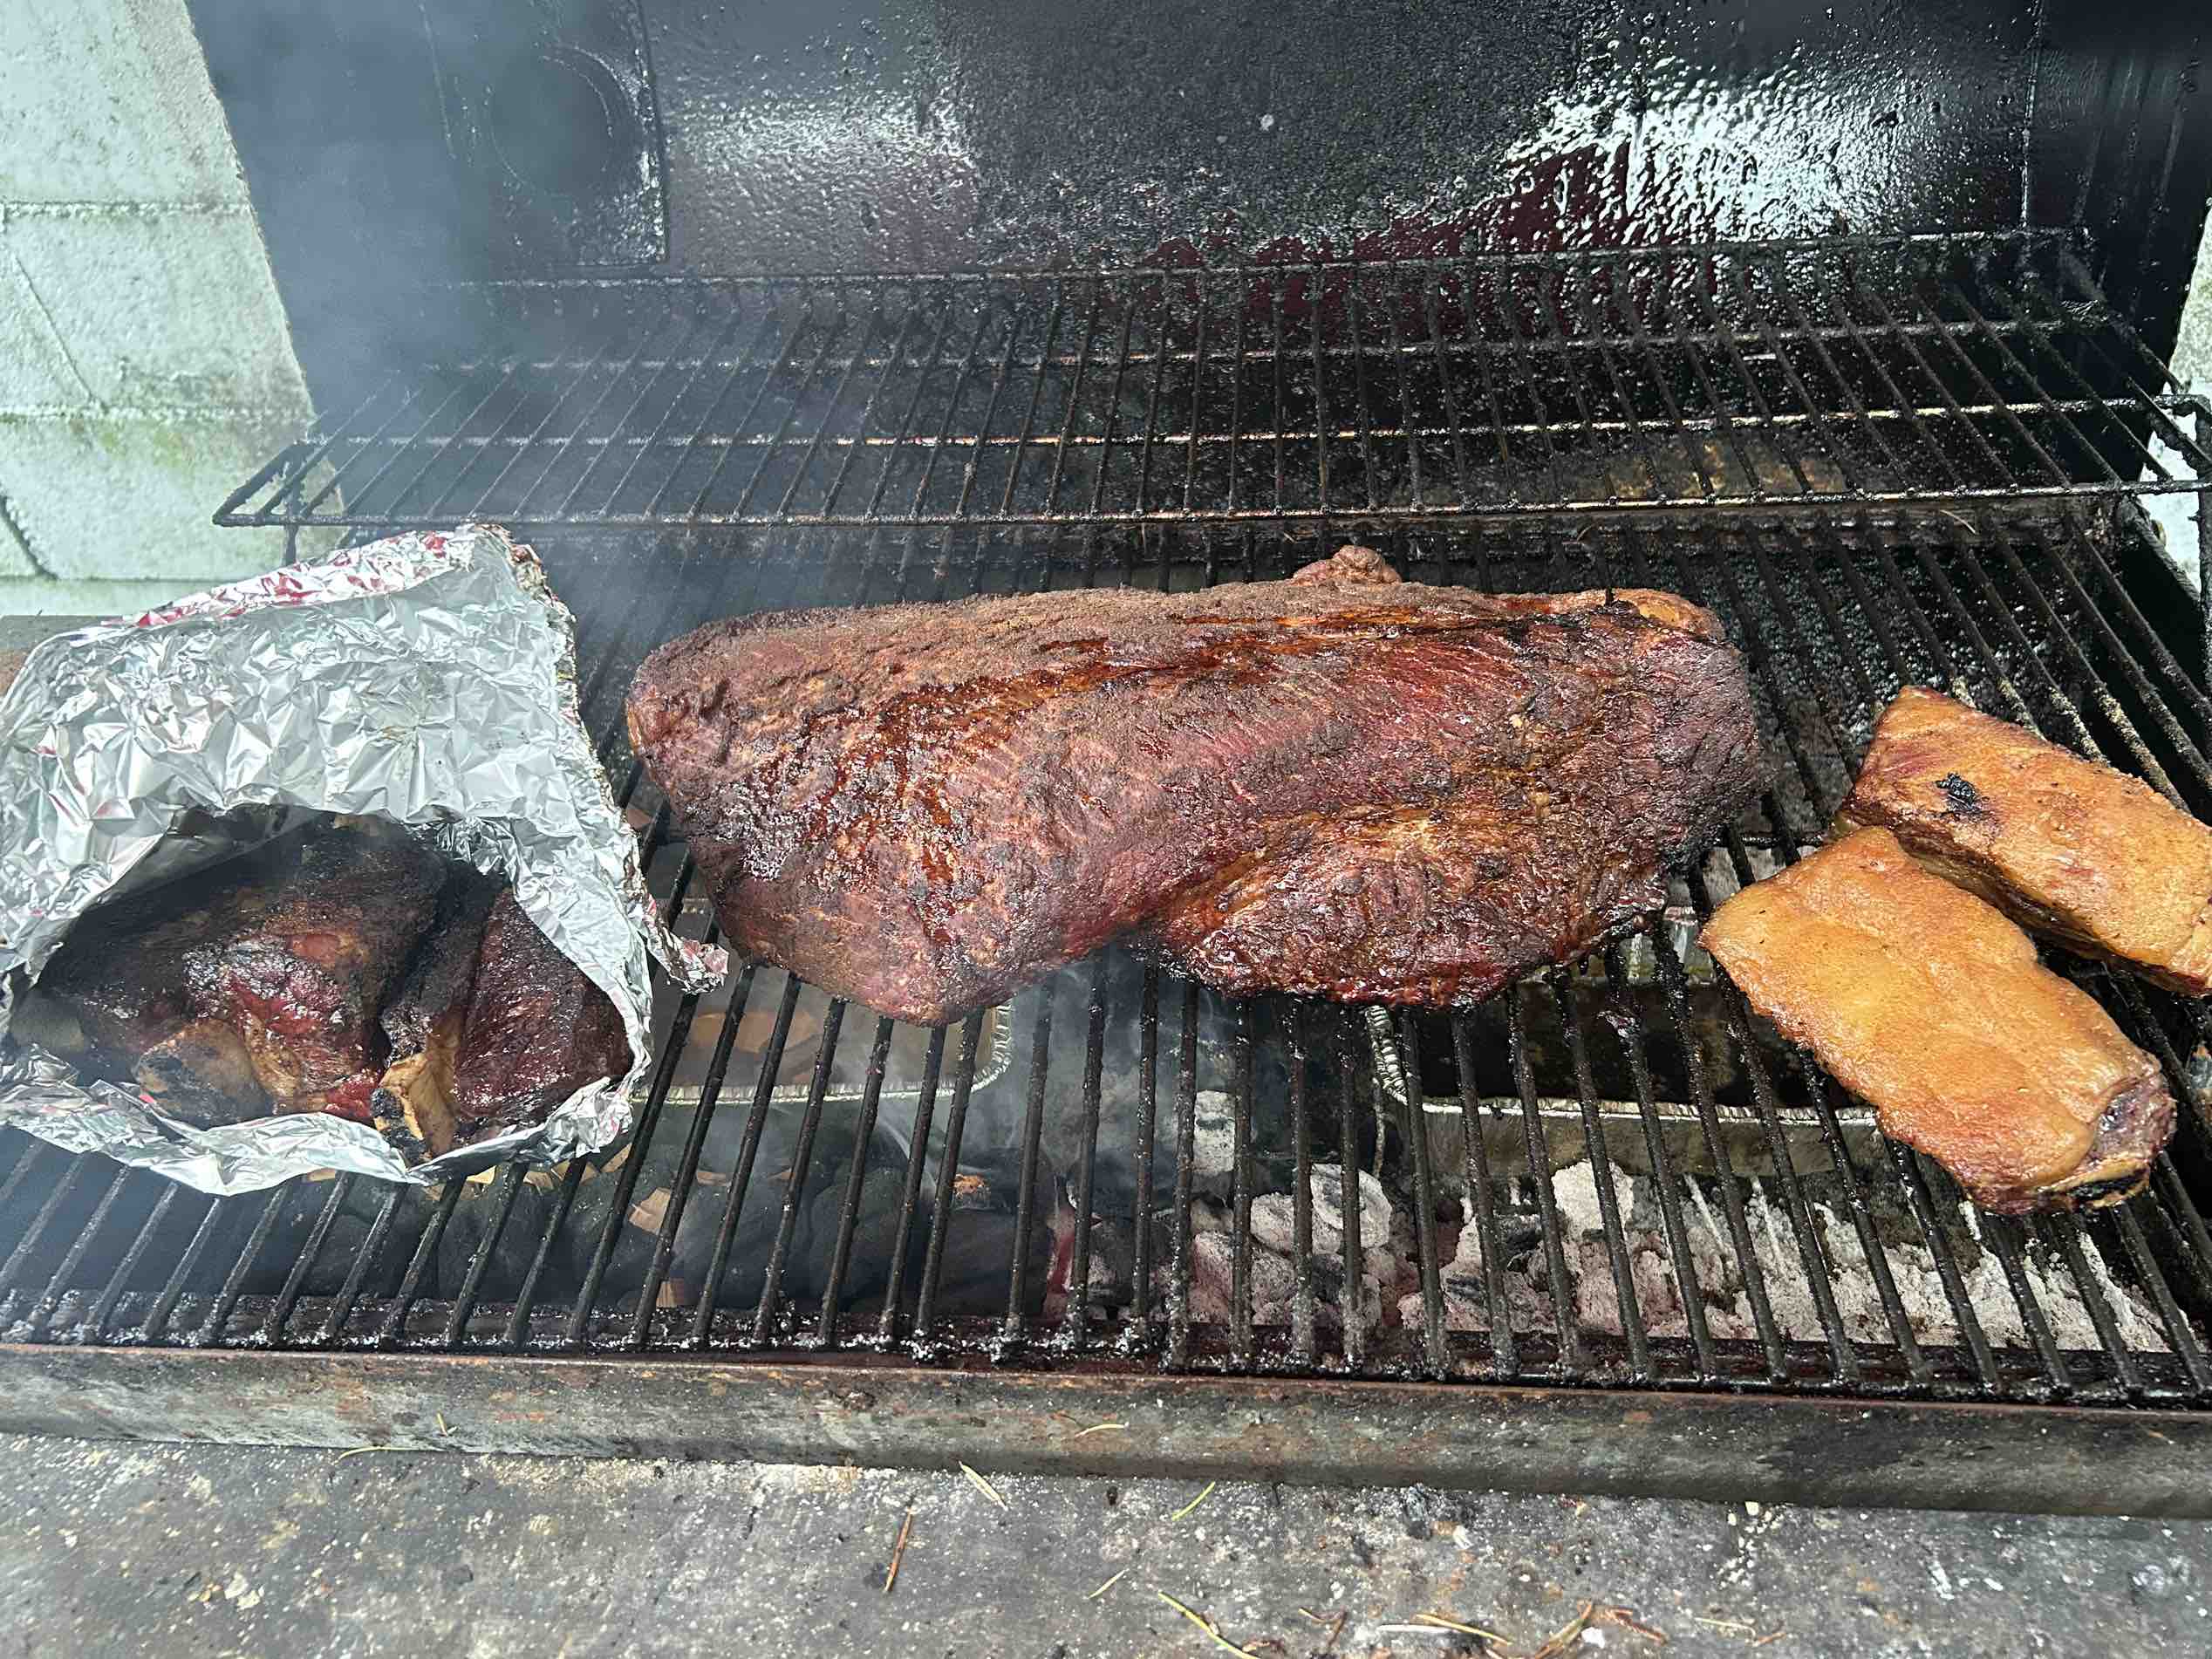
  4. Smoke Unwrapped (Bark Building Phase)
    • Cook unwrapped for first 5–7 hours or until bark is deep mahogany and internal temp hits ~160–175°F.
    • Expect the stall around 150–170°F. Keep lid closed as much as possible.
    • Add more wood/hot water to pans if smoke or moisture dies down.
  5. Wrap (Texas Crutch)
    • When bark looks perfect, wrap tightly in heavy-duty foil or butcher paper.
    • Optional: Add ¼ cup beef broth or a few pats of butter/tallow inside wrap.
    • Return to grill and continue cooking at 225–250°F.
  6. Finish the Cook
    • Cook wrapped until internal temp reaches 195–205°F in the thickest part of the flat.
    • Most important: Probe for tenderness — thermometer should slide in like soft butter with almost no resistance.
    • Total cook time: ~1–1.5 hours per pound.
  7. Rest
    • Leave wrapped (or double-wrap).
    • Place in a dry cooler wrapped in towels.
    • Rest minimum 1 hour, ideally 2–4 hours (it will stay hot for 5+ hours).
  8. Slice & Serve
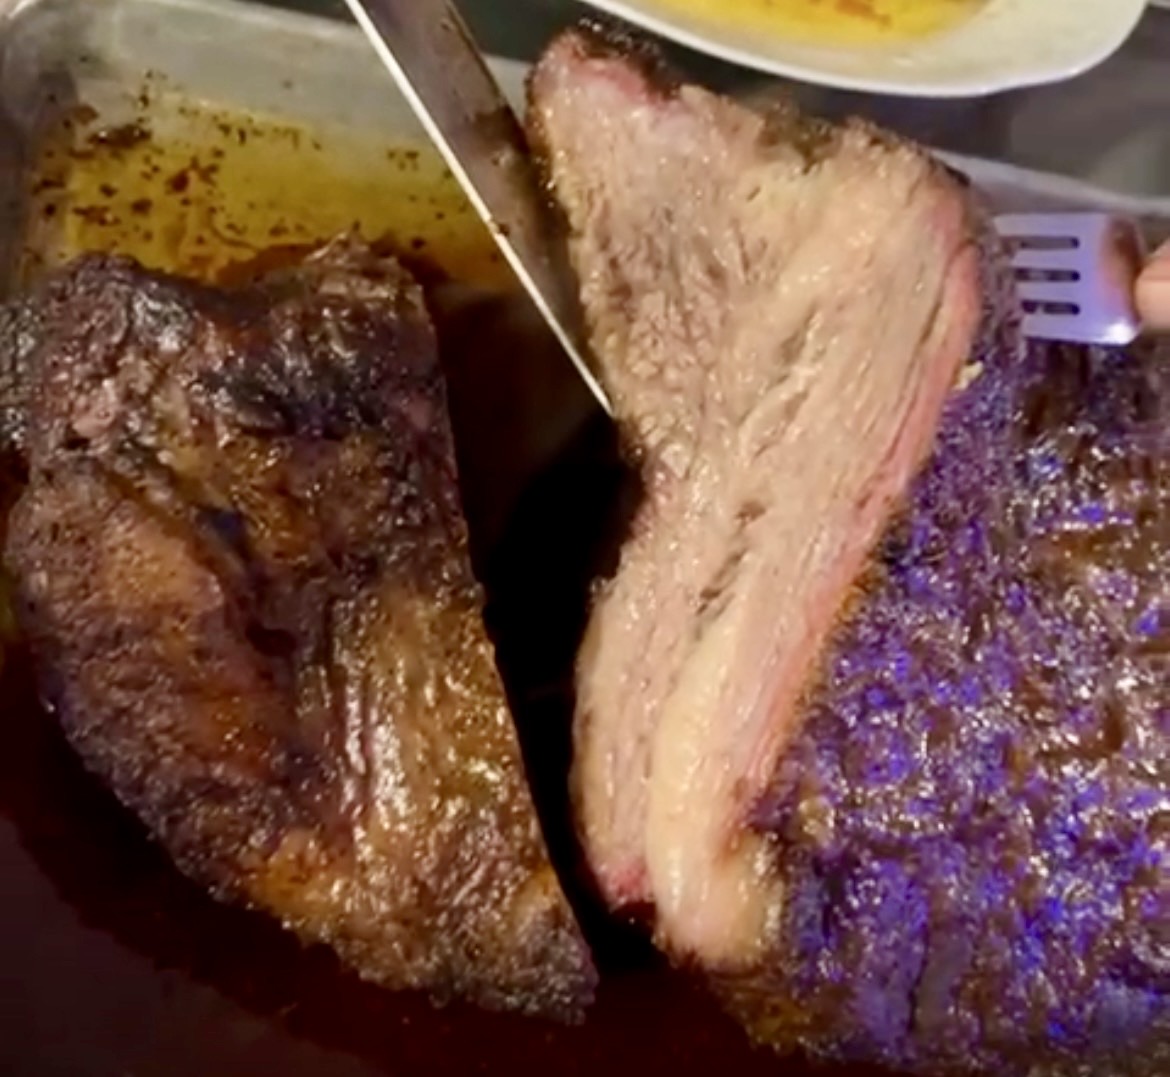
    • Unwrap, separate point from flat if desired.
    • Slice against the grain — flat one direction, point the other.
    • Serve with burnt ends from the point if you cube and sauce them.
Screenshot

Tips for Success

  • Monitor grate-level temp, not just lid thermometer.
  • Thin blue smoke is ideal — white smoke means dirty fire.
  • Using hot water in the pans helps stabilize temperature and keeps the environment moist for juicier results.
  • If temp spikes, close vents. If too low, open slightly or add a few lit briquettes.
  • This method gives competition-level bark and juiciness on a simple kettle.

Next day tip:

Toast some bread and make sandwiches with thin slices of cold brisket, topped with ioli mayonnaise or chimichurry.

Enjoy.

Aioli / Garlic Mayonnaise


Ingredients:

2 eggs
2 garlic cloves (peeled)
Ground pepper (a pinch, black or white)
Salt to taste
Oil (neutral, like sunflower, canola, or light olive oil – about 200-300 ml, added gradually)
Lemon juice (to taste, about 1-2 tablespoons)

Method:

In a tall, narrow container (ideal for the hand blender), add the two eggs, the two peeled garlic cloves, a pinch of pepper, and salt to taste.

Start blending with an immersion blender (minipimer/hand blender) held at the bottom. Slowly pour in the oil in a thin, steady stream (like a drizzle) while keeping the blender running and moving it up and down slightly as the mixture emulsifies and thickens.


Continue blending until it becomes thick and creamy. Finally, add lemon juice to taste, blending a bit more.

Taste it to check the seasoning – adjust salt, lemon, or even add more garlic if needed.

When ready, transfer to a container and refrigerate covered with plastic wrap (directly touching the surface to prevent a skin from forming).

Always return it to the fridge covered with plastic wrap after use.

Consume within 4-5 days maximum due to the risk of salmonella from raw eggs.

Dill Pickle Recipe


INGREDIENTS:

12-14 Persian cucumbers or 8-10 pickling cucumbers

4 garlic cloves, halved

2 teaspoons of mustard seeds

2 teaspoons of peppercorns

a few good-sized dill springs, per jar

2 cups of water

2 cups of distilled white vinegar

1/4 cup of cane sugar

2 tablespoons of sea salt

INSTRUCTIONS:

  1. To make dill pickle spears, slice the cucumbers lengthwise into quarters. To make dill pick chips, thinly slice them horizontally
  2. Divide the cucumbers among 4 (8-ounce) or 2 (16-ounce) jars. Divide the garlic, mustard seeds, peppercorns, and dill springs among each jar.
  3. Heat the water, vinegar, sugar, and sea salt in a medium saucepan over medium heat. Stir until the sugar and salt dissolve, about 1 minute. Let cool slightly and poor over the cucumbers. Set aside to cool to room temperature, then store the pickles in the fridge.
  4. Pickle spears will be lightly pickles in 2 days, but the best flavor will start to develop around day 5 or 6. Pickle chips will be lightly pickled in 1 day, and will become more flavorful every day after that. Store in the fridge for several weeks.

Pasta Frola


Ingredientes:

1 taza de azúcar (200 gramos)

1 1/2 tapas de harina leudaste (300 gramos)

1 huevos entero, 2 yemas

100 gramos de manteca

1 cucharadita de esencia de vainilla

1 pizca de ralladura de limón

400 gramos de dulce de membrillo

Utensilios:

Molde

Espátula de silicona

Bowl

Tamizador

Instrucciones:

Mezclar en un bol el azúcar con la manteca a temperatura ambiente. Incorpora los huevos uno por uno, y la esencia de vainilla y la ralladura le limón. Poco a poco tamizar, añadir, y juntar la maza.

Vuelca la maza en una superficie enharinada y amasa hasta obtener una masa blanda, deja la masa en la nevera por 30 minutos aproximadamente.

Engrasa y espolvorea con harina un molde para horno, y entiende la masa con los dedos. Agrega el membrillo sobre la base de masa de pasta frola que ya has preparado, espárcelo bien por todas partes y cúbrelo con tiras de masa para decorar.

Temperatura de el orno es 350 F esta que este dorado o 20 o 30 minutos.

Keto Danish Butter Cookies (30 cookies)


Equipment

  • Baking Sheet
  • Mixing Bowls

Ingredients

  • 1.25 cups almond flour
  • 1/4 cup coconut flour
  • 1/3 cup Low Carb Sugar Substitute
  • 1 tsp baking powder
  • 6 tbsp butter, room temperature
  • 1/2 tsp vanilla extract

Instructions

  • Preheat oven to 350°F and line a baking sheet with parchment paper or a silicone mat. 
  • In a mixing bowl, combine almond flour, coconut flour, erythritol, and baking powder; mix well using a spoon.
  • Cut in the butter and vanilla and work it with your fingers until a dough forms.
  • Use your hands to roll the dough into 12 equal balls. Place the balls 2-inches apart on prepared baking sheet. Use a fork to flatten and create a striped pattern.
  • Bake the cookies for 11-14 minutes, or until browned around the edges. Transfer to wire rack to cool.
  • Best stored in an air tight container or zip top bag in the fridge up to 10 days.

Notes

Net Carbs: 2g per servingYields: 12 Cookies

Nutrition

Calories: 128kcal | Carbohydrates: 4g | Protein: 3g | Fat: 12g | Fiber: 2g

Garlic Butter Oven Baked Tilapia


RECIPE INGREDIENTS

  • Tilapia Fillets: This recipe uses four medium-sized fillets.
  • Salt and Pepper
  • Dried Thyme, Dried Oregano, and Ground Paprika: Use regular paprika, not hot or smoked paprika.
  • Butter: You’ll need 4 tablespoons, melted.
  • Fresh Garlic: Mince the garlic or put it through a garlic press.
  • Fresh Lemon Juice and Lemon Zest: You’ll need two tablespoons of juice and ¼ teaspoon of zest.
  • Lemon Slices, Red Pepper Flakes, and Chopped Parsley: For garnish.

HOW TO MAKE BAKED TILAPIA

  1. Prepare the Tilapia Fillets. Season tilapia with salt, pepper, paprika, thyme, and oregano; arrange fish in a 9×13 baking dish. In a mixing bowl, whisk together melted butter, garlic, lemon juice, and lemon zest; pour over tilapia.
  2. Bake the Fillets. Bake tilapia for 10 to 12 minutes, or until fish flakes and is fork-tender.
  3. Serve! Garnish with pepper flakes, parsley, and lemon slices and enjoy!

Milhojas / Mille-feuille


Aqui va la receta de varias generaciones (mi bisabuela, abuela y mi mama…) para hacer las milhojas.

Ingredientes:

400g de Harina (3/4 taza son aprox 100g)

400g de Manteca

1 pizca de sal

1 taza de agua

Procedimiento:

1) Hacemos una masa branda con 300g de harina, la pizca de sal y el agua. Reservar

2) Cortamos en trozos pequenos la manteca y le vamos agregando los 100g de harina.

Poner a descanzar los dos bollos en la heladera por unos 20 min.

3) Estirar el bollo de harina y envolver con este el de manteca.

IMG_9706

Poner a descanzar el bollo en la heladera por unos 20 min.

4) Estirar y doblar en tres. Se debe estirar siempre del lado donde se ven los dobleces.

IMG_9707

Poner a descanzar.

5) Estirar y doblar en cuatro.

Poner a descanzar.

6) Estirar y doblar en tres.

Poner a descanzar.

7) Estirar.  Cortar en tiras y arrollarlas. Estirar en forma de disco

IMG_9757

8) Colocar la masa estirada en forma de disco en una pizzera del lado de abajo. Tiene que estar fria junto con la masa para que no encoja. Pincharlas con un tenedor.

IMG_9758

9) Llevar a horno medio hasta que esten doradas.


Repetir el proceso para todos los discos.

IMG_9761


10) Colocar dulce de leche y apilar todos los discos. Decorar con nueces, almendras y si es posible, quinotos en almibar para la tapa de arriba.

IMG_9777.JPG

Paella de Mariscos


paella_de_mariscos

Ingredientes:

  • Aceite de oliva
  • Sal fina
  • Pimienta negra molida
  • Cebollas
  • Morrones de tres colores 3
  • Ajos 1
  • Tomates 3
  • Tubos de calamar 1/2 kilo
  • Arroz doble carolina 1/2 kilo
  • Azafrán 3 cápsulas
  • Caldo de verduras o pollo 2 litros
  • Berberechos 1/2 kilo
  • Mejillones 1/2 kilo
  • Cayos de vieyras 1/2 kilo
  • Langostinos crudos 1/2 kilo
  • Camarones crudos 1/2 kilo
  • Perejil picado 1 tazas
  • Arvejas 2 tazas
  • Limones 1


Cortar los tubos de calamar limpios y secos en cuadrados y marcar cuadros en su superficie.

Saltarlos en la paellera con aceite de oliva y ajo, hasta que esten cocidos (cuando están retorcidos como un cubanito). Retirar y reservar.

En la misma paellera con de oliva, transparentar cebolla, morrones, tomate rallado. Salpimentar.

Agregar el arroz y saltearlo hasta que este translúcido. Agregar el azafrán y el caldo de verduras (o de pollo). Reservar para ir rectificando el nivel de caldo de acuerdo al punto del arroz.

Bajar el fuego y evitar mover demasiado el arroz para evitar que se libere el almidón.

Agregar al arroz, los berberechos, mejillones, vieyras, langostinos y los calamares que estaban reservados.

Al probar el arroz y encontrarlo todavía “al dente”, agregar las arvejas, apagar el fuego, tapar la sartén y dejar reposar unos minutos.
Espolvorear con el perejil picado. Cortar los limones en rodajas y distribuirlos en el borde de la paellera. Servir.


Muffins de Banana


Ingredientes:

  • 100 g de harina
  • 1 cucharada de polvo para hornear
  • 100 g de banana madura
  • 3 huevos
  • 50 g de azúcar blanca
  • 1 cucharada de vainilla
  • 60 ml de leche

Preparacion:

Precalienta el horno a 170°C.

Mezcla en un recipiente pequeño los huevos y el azúcar. Luego añade la banana pisada, la vainilla y la leche. Mezcla todo bien hasta incorporar.

En otro recipiente más grande, mezcla la harina y el polvo para hornear.

Añade los ingredientes húmedos en este recipiente y mezcla hasta integrar bien. No sobrebatir.

Llena los pirotines y hornea por unos 25 minutos o hasta que salga un cuchillo limpio desde el centro y estén ligeramente dorados por encima.

2017-10-29 21.09.59_preview

Cruz asador casera sobre disco/ Homemade Argentine asado cross on fire pit


Cuando cocinamos al asador en otros paises, tenemos que tener cuidado con ciertas medidas de seguridad. Es muy probable que si hicieramos asado o lechon (suckling pig) al asador con la cruz clavada al piso, algun vecino llame a los bomberos.

Por esa razon, donde no hay mucho lugar para cocinar a la cruz o asador, podemos usar un disco (fire pit) adaptandole la cruz.

En este caso, encontre en Home Depot un disco de 31″ que me vino bien para adaptarle la cruz arriba. Este fire pit/disco viene tambien con algunos hierros, espiedo y parrilla additionales que podemos usar para adaptar la cruz.

Con unas barras de acero de 1/4 pasante sobre las manijas del borde, podemos darle angulo de inclinacion a la cruz. Con algunos de los complementos que vienen con el fire pit podemos regular la altura.

vc3kd9pt.jpeg

Aqui las cruces presentadas sobre el disco/fire pit

nPiCFa_4


Aqui lo estamos probando con un buen asado argentino:

lehnKfb9


Y por supuesto que podemos hacer un lechon (suckling pig) o cordero (lamb):

-8fPIOqU

yjY8N0i_HjaX-zmF


Aqui con Eduardo (el picho) Divito, checkeando que todo funcione como debe ser…

62373833_2657675790912521_9027880926725537792_n

Saludos!