aws s3 ls s3://my-bucket/folder --recursive | awk 'BEGIN {total=0}{total+=$3}END{print total/1024/1024" MB"}'
get the size of an Amazon S3 bucket folder / obtener el tamaño de una carpeta en S3
Reply

aws s3 ls s3://my-bucket/folder --recursive | awk 'BEGIN {total=0}{total+=$3}END{print total/1024/1024" MB"}'
If you want to explore how to parallelize the data ingestion into Elasticsearch, please have a look to this post I have written for Amazon AWS:
It explains how to index Common Crawl metadata into Elasticsearch using Cascading connector directly from the S3 data source.
Cascading Source Code is available here.
Ganglia is a scalable distributed monitoring system for high-performance computing systems such as clusters and Grids. It is based on a hierarchical design targeted at federations of clusters. It leverages widely used technologies such as XML for data representation, XDR for compact, portable data transport, and RRDtool for data storage and visualization.

1. Ganglia Monitoring Daemon (gmond)
Gmond stands for ganglia monitoring daemon. It is a lightweight service that is installed on every machine you’d like to monitor.
Gmond has four main responsibilities:
1.1 Monitor changes in host state.
1.2 Announce relevant changes.
1.3 Listen to the state of all other ganglia nodes via a unicast or multicast channel.
1.4 Answer requests for an XML description of the cluster state.
Each gmond transmits information in two different ways:
a. Unicasting or Multicasting host state in external data representation (XDR) format using UDP messages.
b. Sending XML over a TCP connection.
Notes about gmond:
– The main configuration file of gmond is /etc/gmond.conf
– gmond is multithreaded
Test gmond installation:
telnet localhost 8649
You should see XML that conforms to the ganglia XML spec.
Or
gmond -d 5 -c /etc/ganglia/gmond.conf
to see the service in debugging mode.
2. Ganglia Meta Daemon (gmetad)
The ganglia meta daemon (gmetad) is a service that collects data from other gmetad and gmond sources and stores their state to disk in indexed round-robin (RRD) databases. Gmetad provides a simple query mechanism for collecting specific information about groups of machines.
Notes about gmetad:
– the main configuration file for gmetad is /etc/gmetad.conf
– You need atleast one gmetad daemon installed node on each cluster.
– This gemetad daemon is the one who collects data send by gmond daemon.
– All other nodes other than the one in the cluster, do not require gmetad daemon to be installed.
– If you need the machine containing gmetad configured as node to be monitored, then in that case you need to install both gmond and gmetad on the machine.
Test gmetad installation:
telnet localhost 8651
3. Ganglia PHP Web Front-end
The Ganglia web front-end provides a view of the gathered information via real-time dynamic web pages. Most importantly, it displays Ganglia data in a meaningful way for system administrators and computer users using PHP.

In this picture we can see gmond installed in each node and sending data to gmetad installed in a “gmetad node”. We can have one or more “nodes with gmetad” in a cluster.
gmetad collects all the data from gmond and stores it in rrdtool database. Which is then collected by the php scripts, and showed as the first picture in this article.
4. Gmetrics
The ganglia metric tool is a commandline application that you can use to inject custom made metrics about hosts that are being monitored by ganglia. It has the ability to spoof messages as coming from a different host in case you want to capture and report metrics from a device where you don’t have gmond running (like a network or other embedded device).
5. Gstat
The ganglia stat tool is a commandline application that you can use to query a gmond for metric information directly.
6. RRD tool:
Ganglia uses RRD tool to store its data and visualization.
RRD tool is the short form for Round Robin Data base tool. This is a wonderful and useful open source data base tool. In this RRD stores data in time-series. For example RRD tool will store all values of CPU load at a certain time interval and then graph these data according to time.
1) Build the package with the provided pom.xml:
$ mvn package
2) Rebuild the RPM structure:
$ mvn -DskipTests=true rpm:rpm
A structure like the following will be created:
/target/rpm/<app_name>/BUILD
/target/rpm/<app_name>/RPMS
/target/rpm/<app_name>/SOURCES
/target/rpm/<app_name>/SPECS
/target/rpm/<app_name>/SRPMS
Shark cage diving – Gaansbaai, South Africa.
Estos son los pasos para instalar mapas de cualquier país del mundo en un GPS Garmin:
1) De la página de Garmin descargamos el Garmin Express para Windows
1.2) Instalamos y abrimos. Conectamos el GPS y lo añadimos como dispositivo.
2) Desde la página de Garmin también, descargamos el BaseCamp e instalamos.
3) Desde el proyecto OpenStreeMap descargamos los mapas de la zona que deseamos.
3.1) Seleccionamos “Generic Routable”
3.2) Seleccionamos un Pais/estado del dropdown box y descargamos el mapa. Este es un ejecutable que descomprimira en C:\Garmin\Maps\ZonaElegida
4) Abrimos el BaseCamp. En Mapas veremos el mapa descargado.
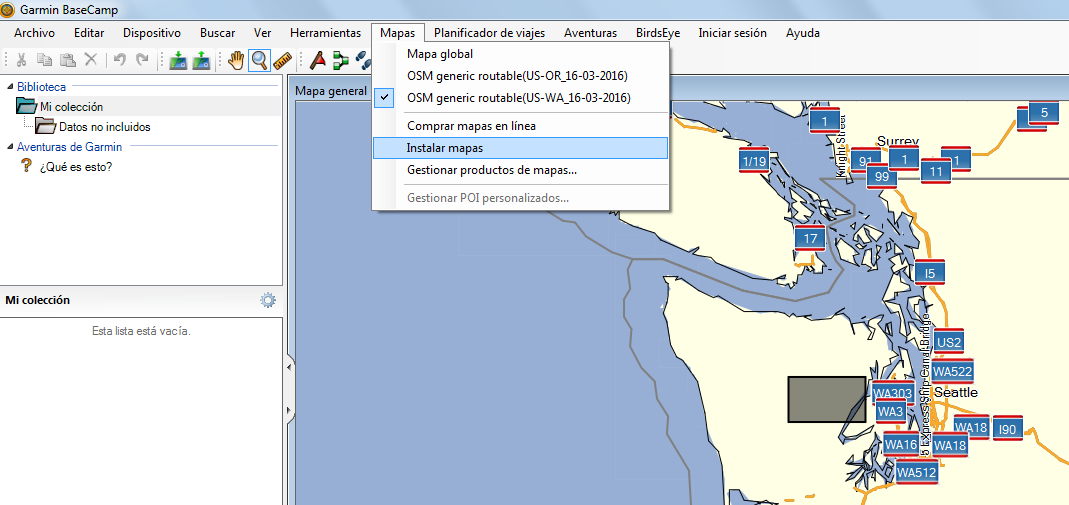
5) Conectamos el GPS con el cable USB. En BaseCamp seleccionamos del menú Mapas –> Instalar Mapas.
Una vez finalizada la carga, tendremos los mapas actualizados y listos para usar.
Update: Como opción rápida, en vez de utilizar BaseCamp, desde openstreetmap, podemos descargar directamente el archivo osm_generic_gmapsupp.zip y colocarlo (descomprimido) en el disco del dispotivo. En los ultimos modelos, va en la carpeta Map.
1) Connect to HBase. Connect to your running instance of HBase using the hbase shell command, located in the bin/ directory of your HBase install.
$ ./bin/hbase shell
hbase(main):001:0>
2) Create a table. Use the create command to create a new table. You must specify the table name and the ColumnFamily name.
hbase(main):001:0> create 'test', 'cf'
0 row(s) in 0.4170 seconds

=> Hbase::Table - test
3) List Information About your Table.
hbase(main):002:0> list 'test'
TABLE
test
1 row(s) in 0.0180 seconds

=> ["test"]
4) Put data into your table. Here, we insert three values, one at a time. The first insert is at row1, column cf:a, with a value of value1. Columns in HBase are comprised of a column family prefix, cf in this example, followed by a colon and then a column qualifier suffix, a in this case.
hbase(main):003:0> put 'test', 'row1', 'cf:a', 'value1'
0 row(s) in 0.0850 seconds

hbase(main):004:0> put 'test', 'row2', 'cf:b', 'value2'
0 row(s) in 0.0110 seconds

hbase(main):005:0> put 'test', 'row3', 'cf:c', 'value3'
0 row(s) in 0.0100 seconds
5) Scan the table for all data at once. One of the ways to get data from HBase is to scan. Use the scan command to scan the table for data. You can limit your scan, but for now, all data is fetched.
hbase(main):006:0> scan 'test'
ROW COLUMN+CELL
 row1 column=cf:a, timestamp=1421762485768, value=value1
 row2 column=cf:b, timestamp=1421762491785, value=value2
 row3 column=cf:c, timestamp=1421762496210, value=value3
3 row(s) in 0.0230 seconds
6) Get a single row of data.
hbase(main):007:0> get 'test', 'row1'
COLUMN CELL
 cf:a timestamp=1421762485768, value=value1

1 row(s) in 0.0350 seconds
7) Disable a table. If you want to delete a table or change its settings, as well as in some other situations, you need to disable the table first, using the disable command. You can re-enable it using the enable command.
hbase(main):008:0> disable 'test'
0 row(s) in 1.1820 seconds

hbase(main):009:0> enable 'test'
0 row(s) in 0.1770 seconds
8) Disable the table again if you tested the enable command above:
hbase(main):010:0> disable 'test'
0 row(s) in 1.1820 seconds
9) Drop the table.
hbase(main):011:0> drop 'test'
0 row(s) in 0.1370 seconds
10) Backup and restore to S3:
10.1) BackUp:
hadoop jar /home/hadoop/lib/hbase.jar emr.hbase.backup.Main --backup --backup-dir s3://your-bucket/backups/j-XXXX
10.2) Restore:
hadoop jar /home/hadoop/lib/hbase.jar emr.hbase.backup.Main --restore --backup-dir s3://your-bucket/backup-hbase/j-XXXX'
10.3) Import:
hbase org.apache.hadoop.hbase.mapreduce.Import test s3n://your-bucket/backup-hbase/j-XXXX
11) Backup and Restore with Distcp and S3distCp:
11.1) Using Distcp method to backup to S3:
hadoop distcp hdfs://ec2-52-16-22-167.eu-west-1.compute.amazonaws.com:9000/hbase/ s3://your-bucket/hbase/201502280715/
11.2) Using Distcp to backup to another cluster:
hadoop distcp hdfs://ec2-52-16-22-167.eu-west-1.compute.amazonaws.com:9000/hbase/ hdfs://ec2-54-86-229-249.compute-1.amazonaws.comec2-2:9000/hbase/
11.3) Using S3distcp method to backup to S3:
hadoop jar ~/lib/emr-s3distcp-1.0.jar --src hdfs:///hbase/ --dest s3://your-bucket/hbase/201502280747/
Hoy fuimos al Christiaan Barnard Memorial Hospital, e inmediatamente me acordé de René Favaloro, pensando si esas dos eminencias de la cardiología serían contemporáneos…
Revolviendo en internet encontré esta foto.

Comparto una profunda admiración por estos dos científicos del corazón (en todo el sentido de la palabra).
Handling JSON files with Hive is not always an easy task.
If you need to extract some specific fields from a structured JSON, we have some alternatives:
There are two UDF functions that are usually helpful on this cases: ‘get_json_object’ and ‘json_tuple’. These functions allows you to access json fields from Hive without installing additional libraries.
get_json_object:
https://cwiki.apache.org/confluence/display/Hive/LanguageManual+UDF#LanguageManualUDF-get_json_object
json_tuple:
https://cwiki.apache.org/confluence/display/Hive/LanguageManual+UDF#LanguageManualUDF-json_tuple
To navigate JSON structure with get_json_object, the entire JSON file has to be mapped as string.
As example:
1) Create the external table as string:
CREATE EXTERNAL TABLE json_table (str string) LOCATION 's3://mybucket/input/jsonserde' ;
2) select field[0] from store.fruit field:
select get_json_object(json_table.str, '$.store.fruit\[0]') as MyField from json_table;
![]()
If you need to add Elasticsearch and Kibana on EMR, please have a look to this post I have written for Amazon AWS:
It contains all the steps to launch a cluster and perform the basic testings on both tools.
Additionally, here you will find the source code for the bootstrap actions used to configure Elasticsearch and Kibana on the EMR Hadoop cluster:
https://github.com/awslabs/emr-bootstrap-actions/tree/master/elasticsearch
![]()
Si necesitas Elasticsearch y Kibana instalado en un cluster EMR, por favor, mira esta publicacion que he escrito para Amazon AWS:
Contiene todos los pasos para crear un cluster y realizar las pruebas basicas en las dos herramientas.
Adicionalmente, aqui encontraras el codigo fuente para las bootstrap actions que uso para instalar Elasticsearch y Kibana en el EMR Hadoop cluster.
https://github.com/awslabs/emr-bootstrap-actions/tree/master/elasticsearch
